Now the step is to create a Product Grid on home page. So go to Dashboard-->Reactive Templates-->All Grid Shortcodes-->Add New Shortcode.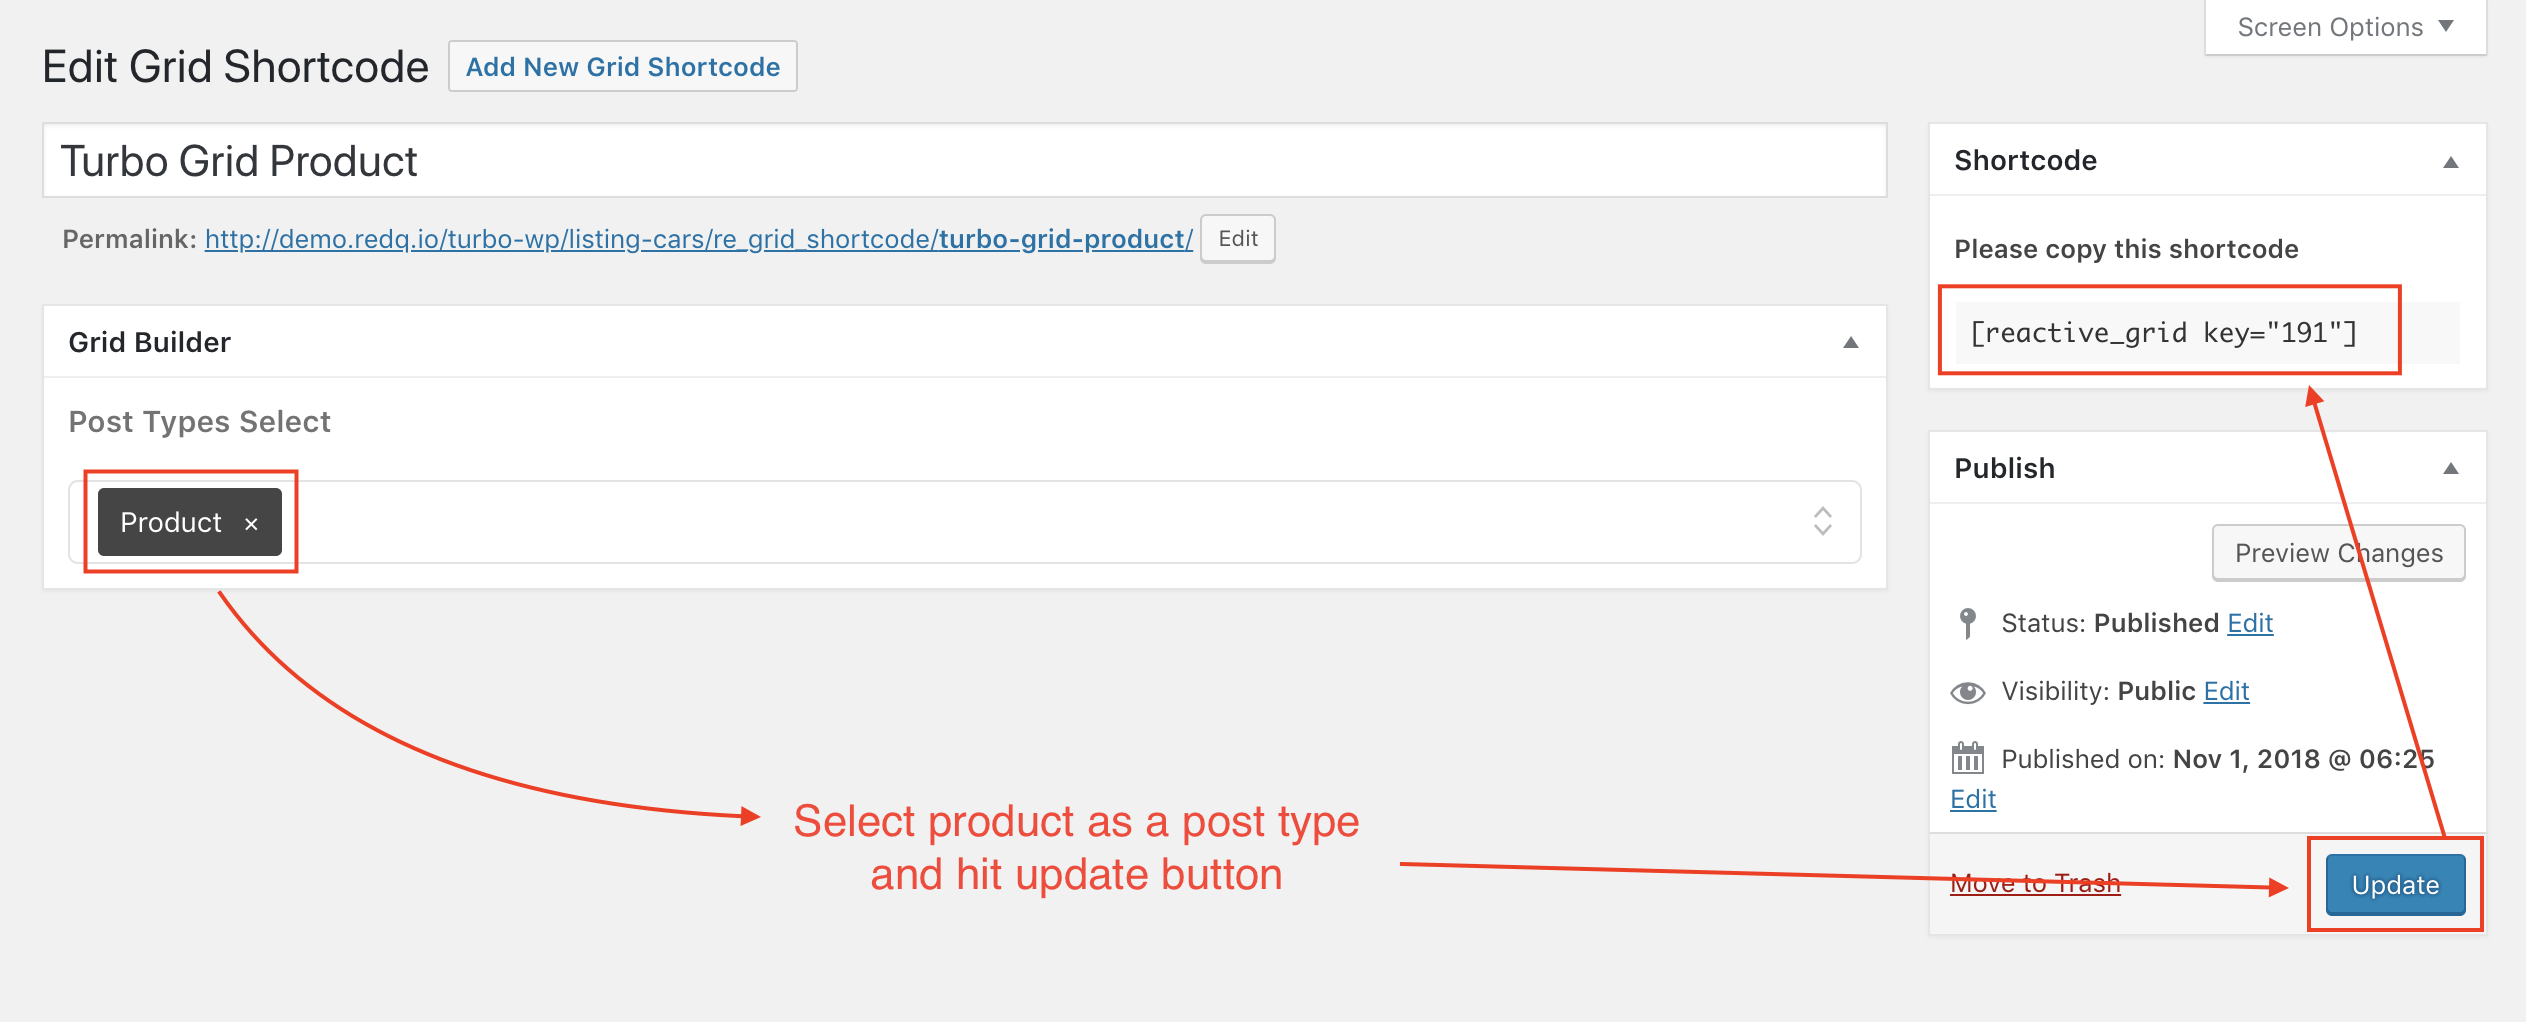 Now go home page and click on edit page. Add a fancy title block. Your fancy title layout should be listing fancy title. Then add a new row and paste Grid Shortcode key you just have created previously.Then click update. Below is the sample of a screenshot.
 Now go to the home page. You may notice that Latest Premium Cars is not similar to our demo. But there is a procedure to match it with our demo. So click on the settings bar of Latest Premium Cars.
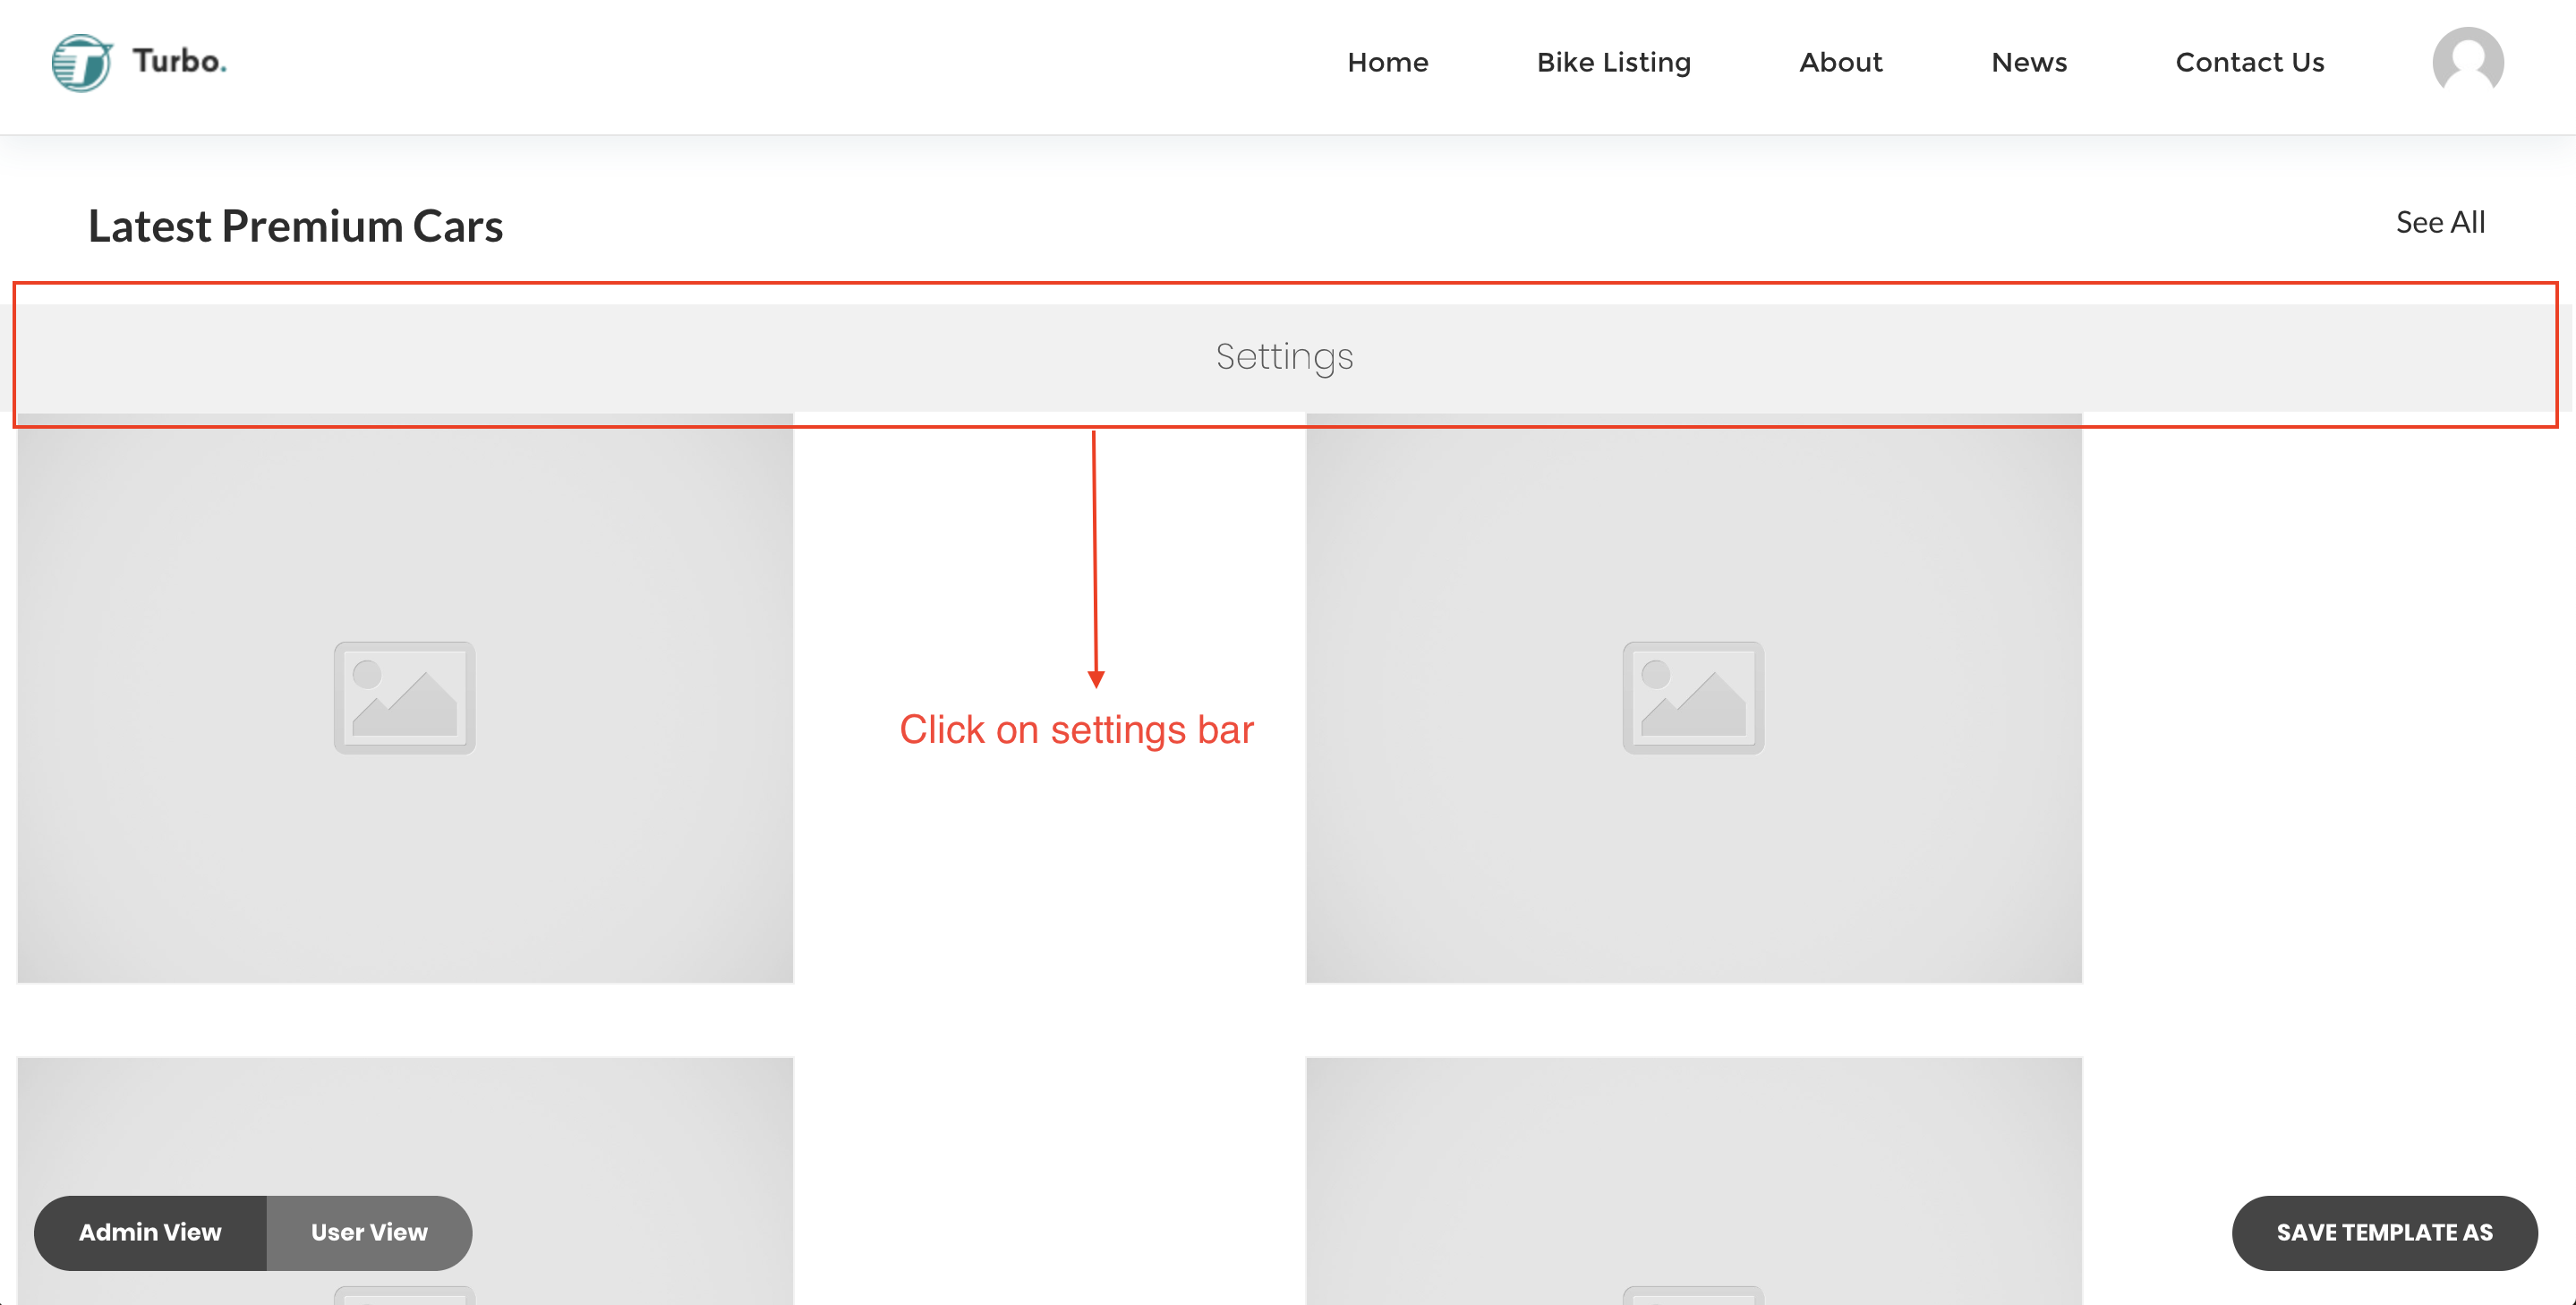
So go to Settings tab, Select Grid Type Taxonomy-->Post Types and click on save button.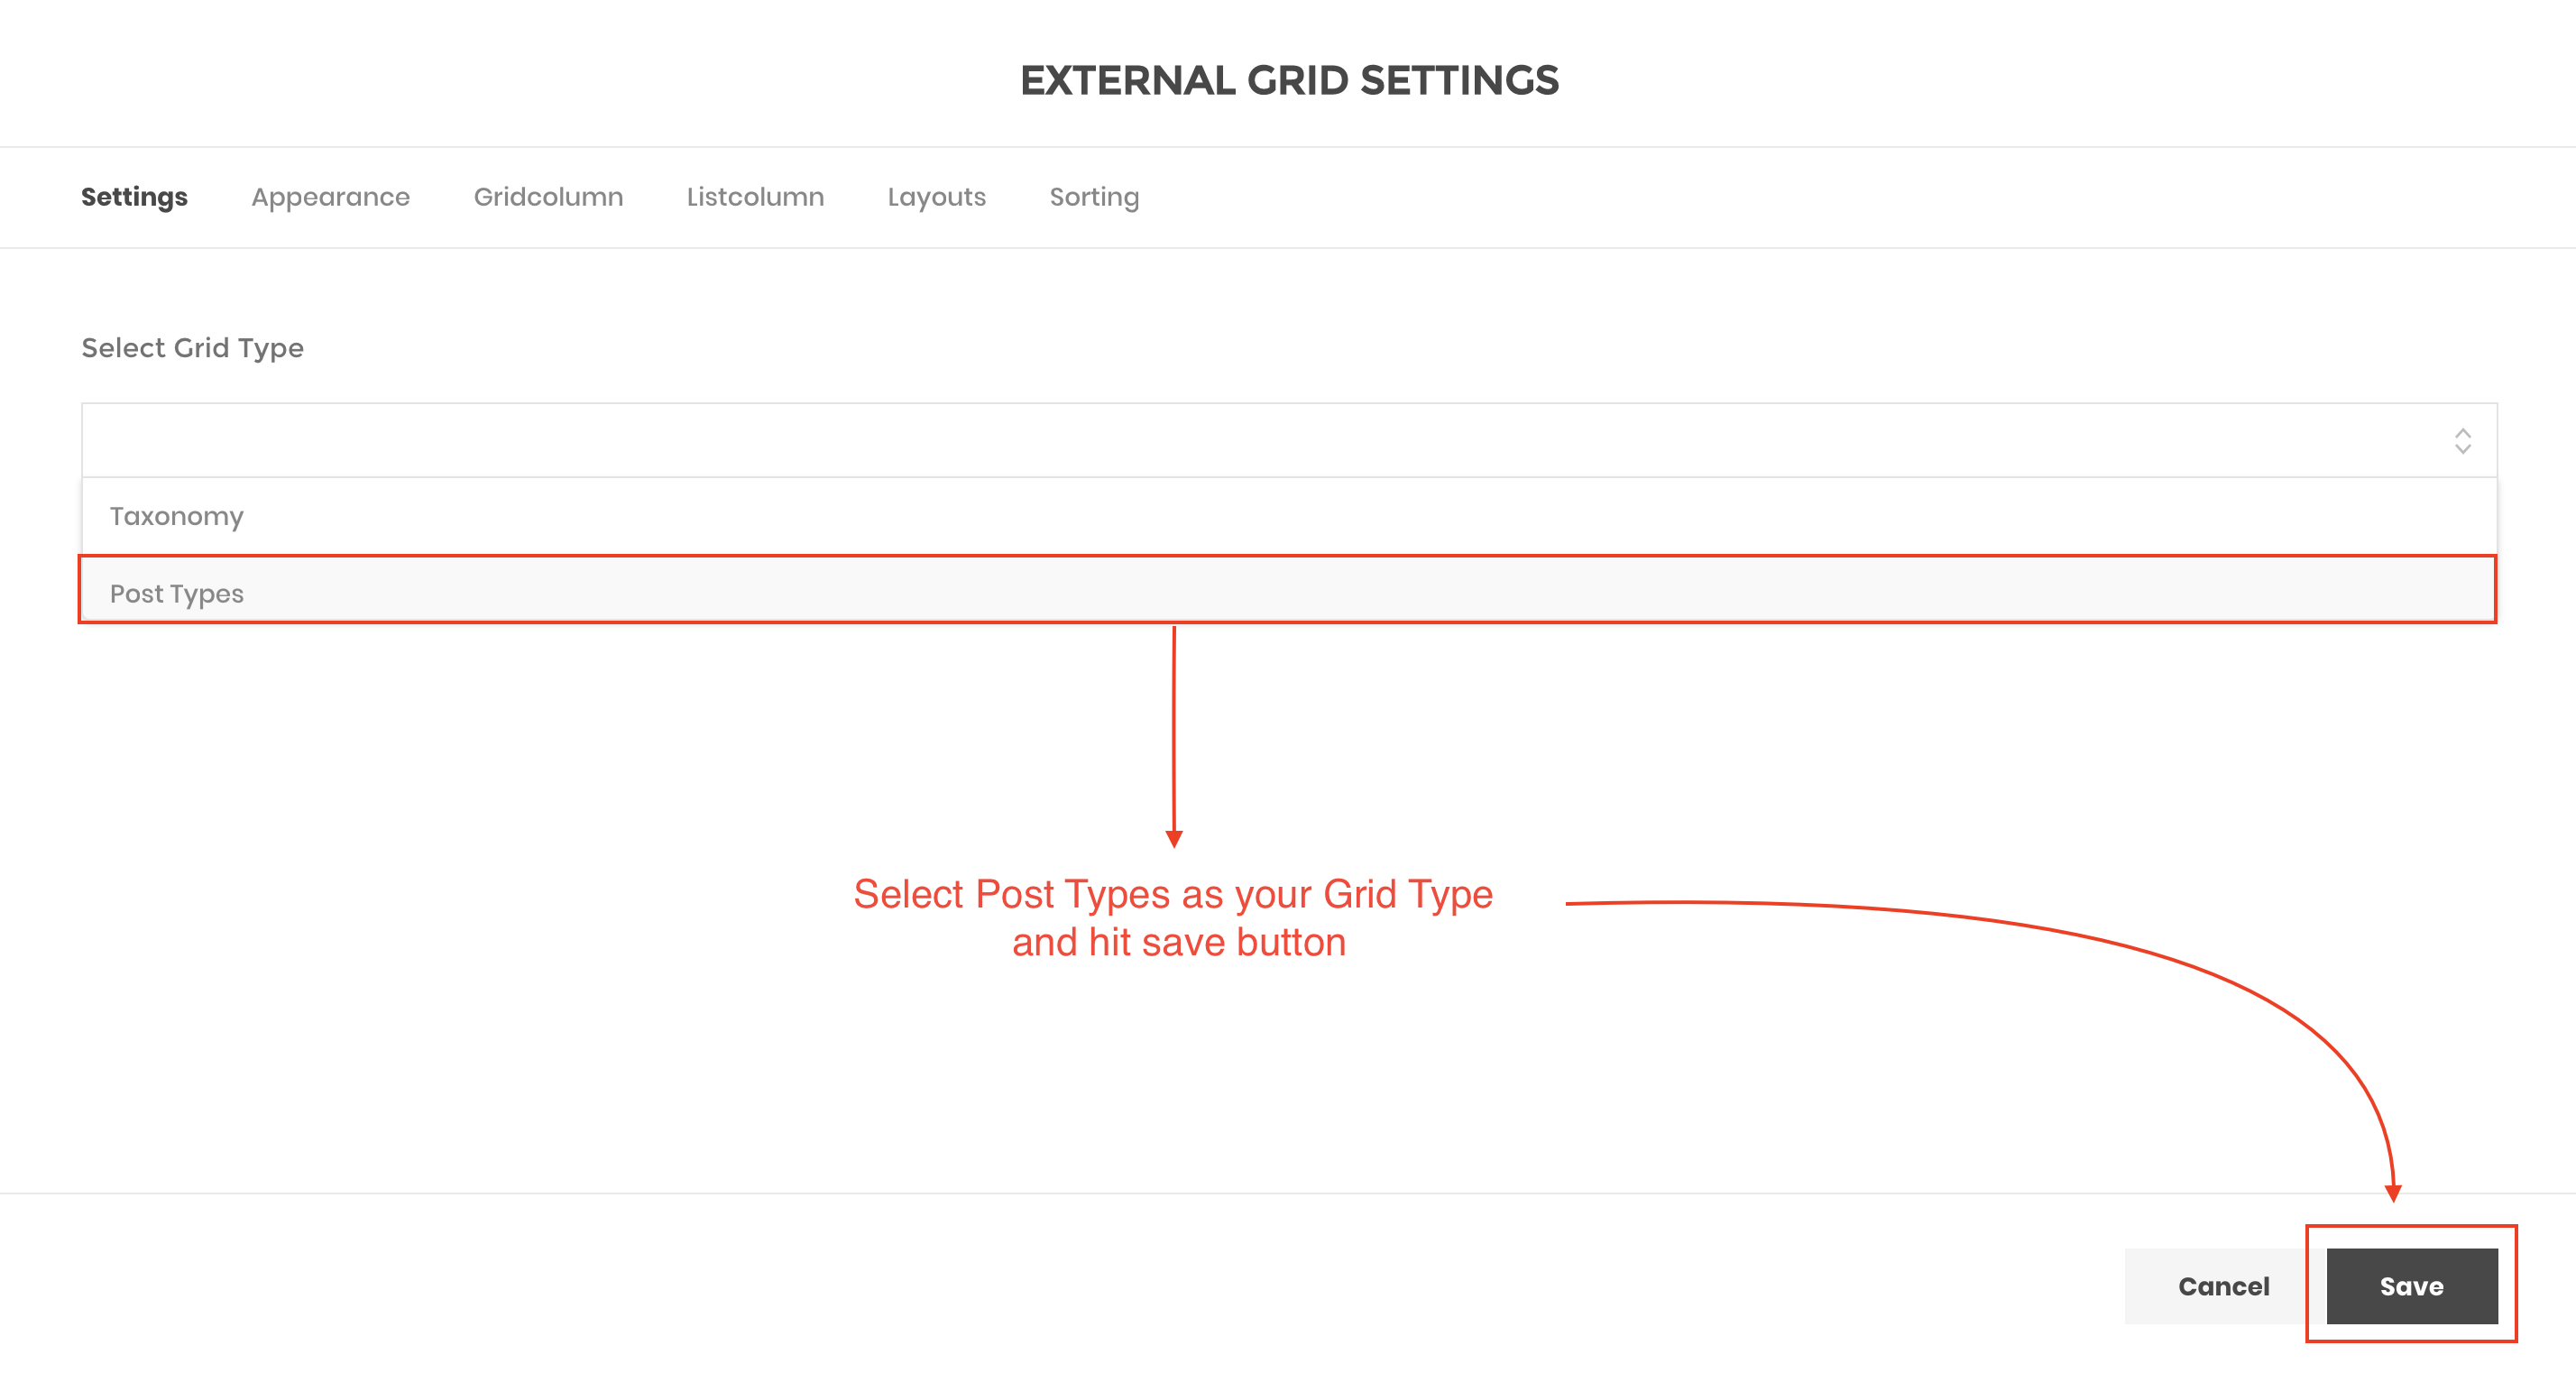 Now it is time to create a new grid template like Airbnb. In order to create this template you need to go to Dashboard-->Reactive Templates-->All Grid Templates-->Add New Grid Template. Copy our provided code and paste it here. To do this see our screenshot below.
<div class="reactive-container-fluid turbo-airbnb-grid">

    <# if(data.view == 'list') { #>
    <div class="reactive-row {{ data.listClass }}">
    <# } else { #>
    <div class="reactive-row">
    <# } #>

        <# _.each(data.posts, function( post ) { #>

        <#
          var isPreviewEnable = data.gridSettings.previewPopUp;
          var postLink = post.post_link;
          var wishlist_added = false;
          var icon_class = "fa fa-heart-o";
          var user_id = '';
          var user_wished = '';
          var wishlist_class = "redq-wwc-add-wishlist reactiveWishlist";
          user_id = REACTIVE.current_user.ID;
          if(post.meta._user_wished) {
              user_wished = post.meta._user_wished;
            for (const key in user_wished) {
                if (user_wished.hasOwnProperty(key) && user_wished[key] == user_id) {
                    wishlist_added = true;
                    icon_class = "fa fa-heart";
                            wishlist_class = "redq-wwc-add-wishlist reactiveWishlist wished";
                }
            }
          }
          if(isPreviewEnable == 'true')
            postLink = '#';
        #>

        <!-- Grid -->

        <# if(data.view == 'list') { #>
          <div key=src={{ post.ID }} data-uid={{ post.ID }} class="{{data.listColumnClass}} reactive-product-listing-list-item fadeIn" data-wow-duration=".5s" data-wow-delay={{ post.delay}} >

        <# } else { #>


          <div key=src={{ post.ID }} data-uid={{ post.ID }} class="{{data.columnClass}} reactive-product-listing-item fadeIn " data-wow-duration=".5s" data-wow-delay={{ post.delay}} >
              <div class="reactive-image-wrapper">
                    <# if(post.meta._product_image_gallery_links && post.meta._product_image_gallery_links.length > 1) { #>
                  <div class="reactive-lightbox-gallery product-image-wrapper turbo-owl-carousel owl-carousel owl-theme">
                      <# _.each(post.meta._product_image_gallery_links, function( image ) { #>
                          <a class="reactiveImagePopup" href={{postLink}}>
                          <# if(image) { #>
                            <img class="item" src={{ image }}>
                          <# } else {#>
                            <img class="item" src={{ data.gridPlaceHolder }} alt="Image">
                          <# } #>
                          </a>
                      <# }) #>
                  </div>
                    <# } else { #>

                  <div class="product-image-wrap">
                      <a class="reactiveImagePopup" href={{postLink}}>
                        <# if(post.thumb_url) { #>
                          <img class="item" src={{ post.thumb_url }}>
                        <# } else {#>
                          <img class="item" src={{ data.gridPlaceHolder }}>
                        <# } #>
                      </a>
                  </div>
                  <# } #>
                  <a href="#"
                     class="{{wishlist_class}}"
                     data-preview="icon"
                     data-text="Favorite"
                     data-icon="fa fa-heart"
                     data-icon_alt="fa fa-heart-o"
                     data-product_id="{{post.ID}}"
                     already_added="{{wishlist_added}}"
                     data-post_type="{{post.post_type}}"
                    >
                        <i class="{{icon_class}}"></i>
                   </a>
                 </div>

                 <div class="product-short-info">
                    <# if (post.meta.formattedAddress) { #>
                         <address>{{ post.meta.formattedAddress }}</address>
                    <# } #>

                    <h3 class="title">
                      <a href="{{postLink}}">{{post.post_title}}</a>
                    </h3>
                    <# if(post.meta._price) { #>
                      <p class="price">${{ post.meta._price }} USD</p>
                    <# } #>

                     <div class="listing-btn-area">
                       <a class="view-details-btn" href="{{post.post_link}}">View Details</a>
                     </div>
                 </div>
             </div>
          <# } #>
          <!-- Grid End -->
      <# }) #>
    </div>
</div>
Again go to your home page and refresh it. Then click on settings bar of Latest Premium Cars.Now go to Layouts tab and choose Airbnb Grid as your Grid Layout. Then go to Appearance tab. Here Wrapper Class name should be turbo-airbnb__grid-template. Then you can find Number Point field. So you can increase or decrease the number according to your requirement. Select Component should be Grid. Then go to Gridcolumn tab and set your product column according to your need and click on save button.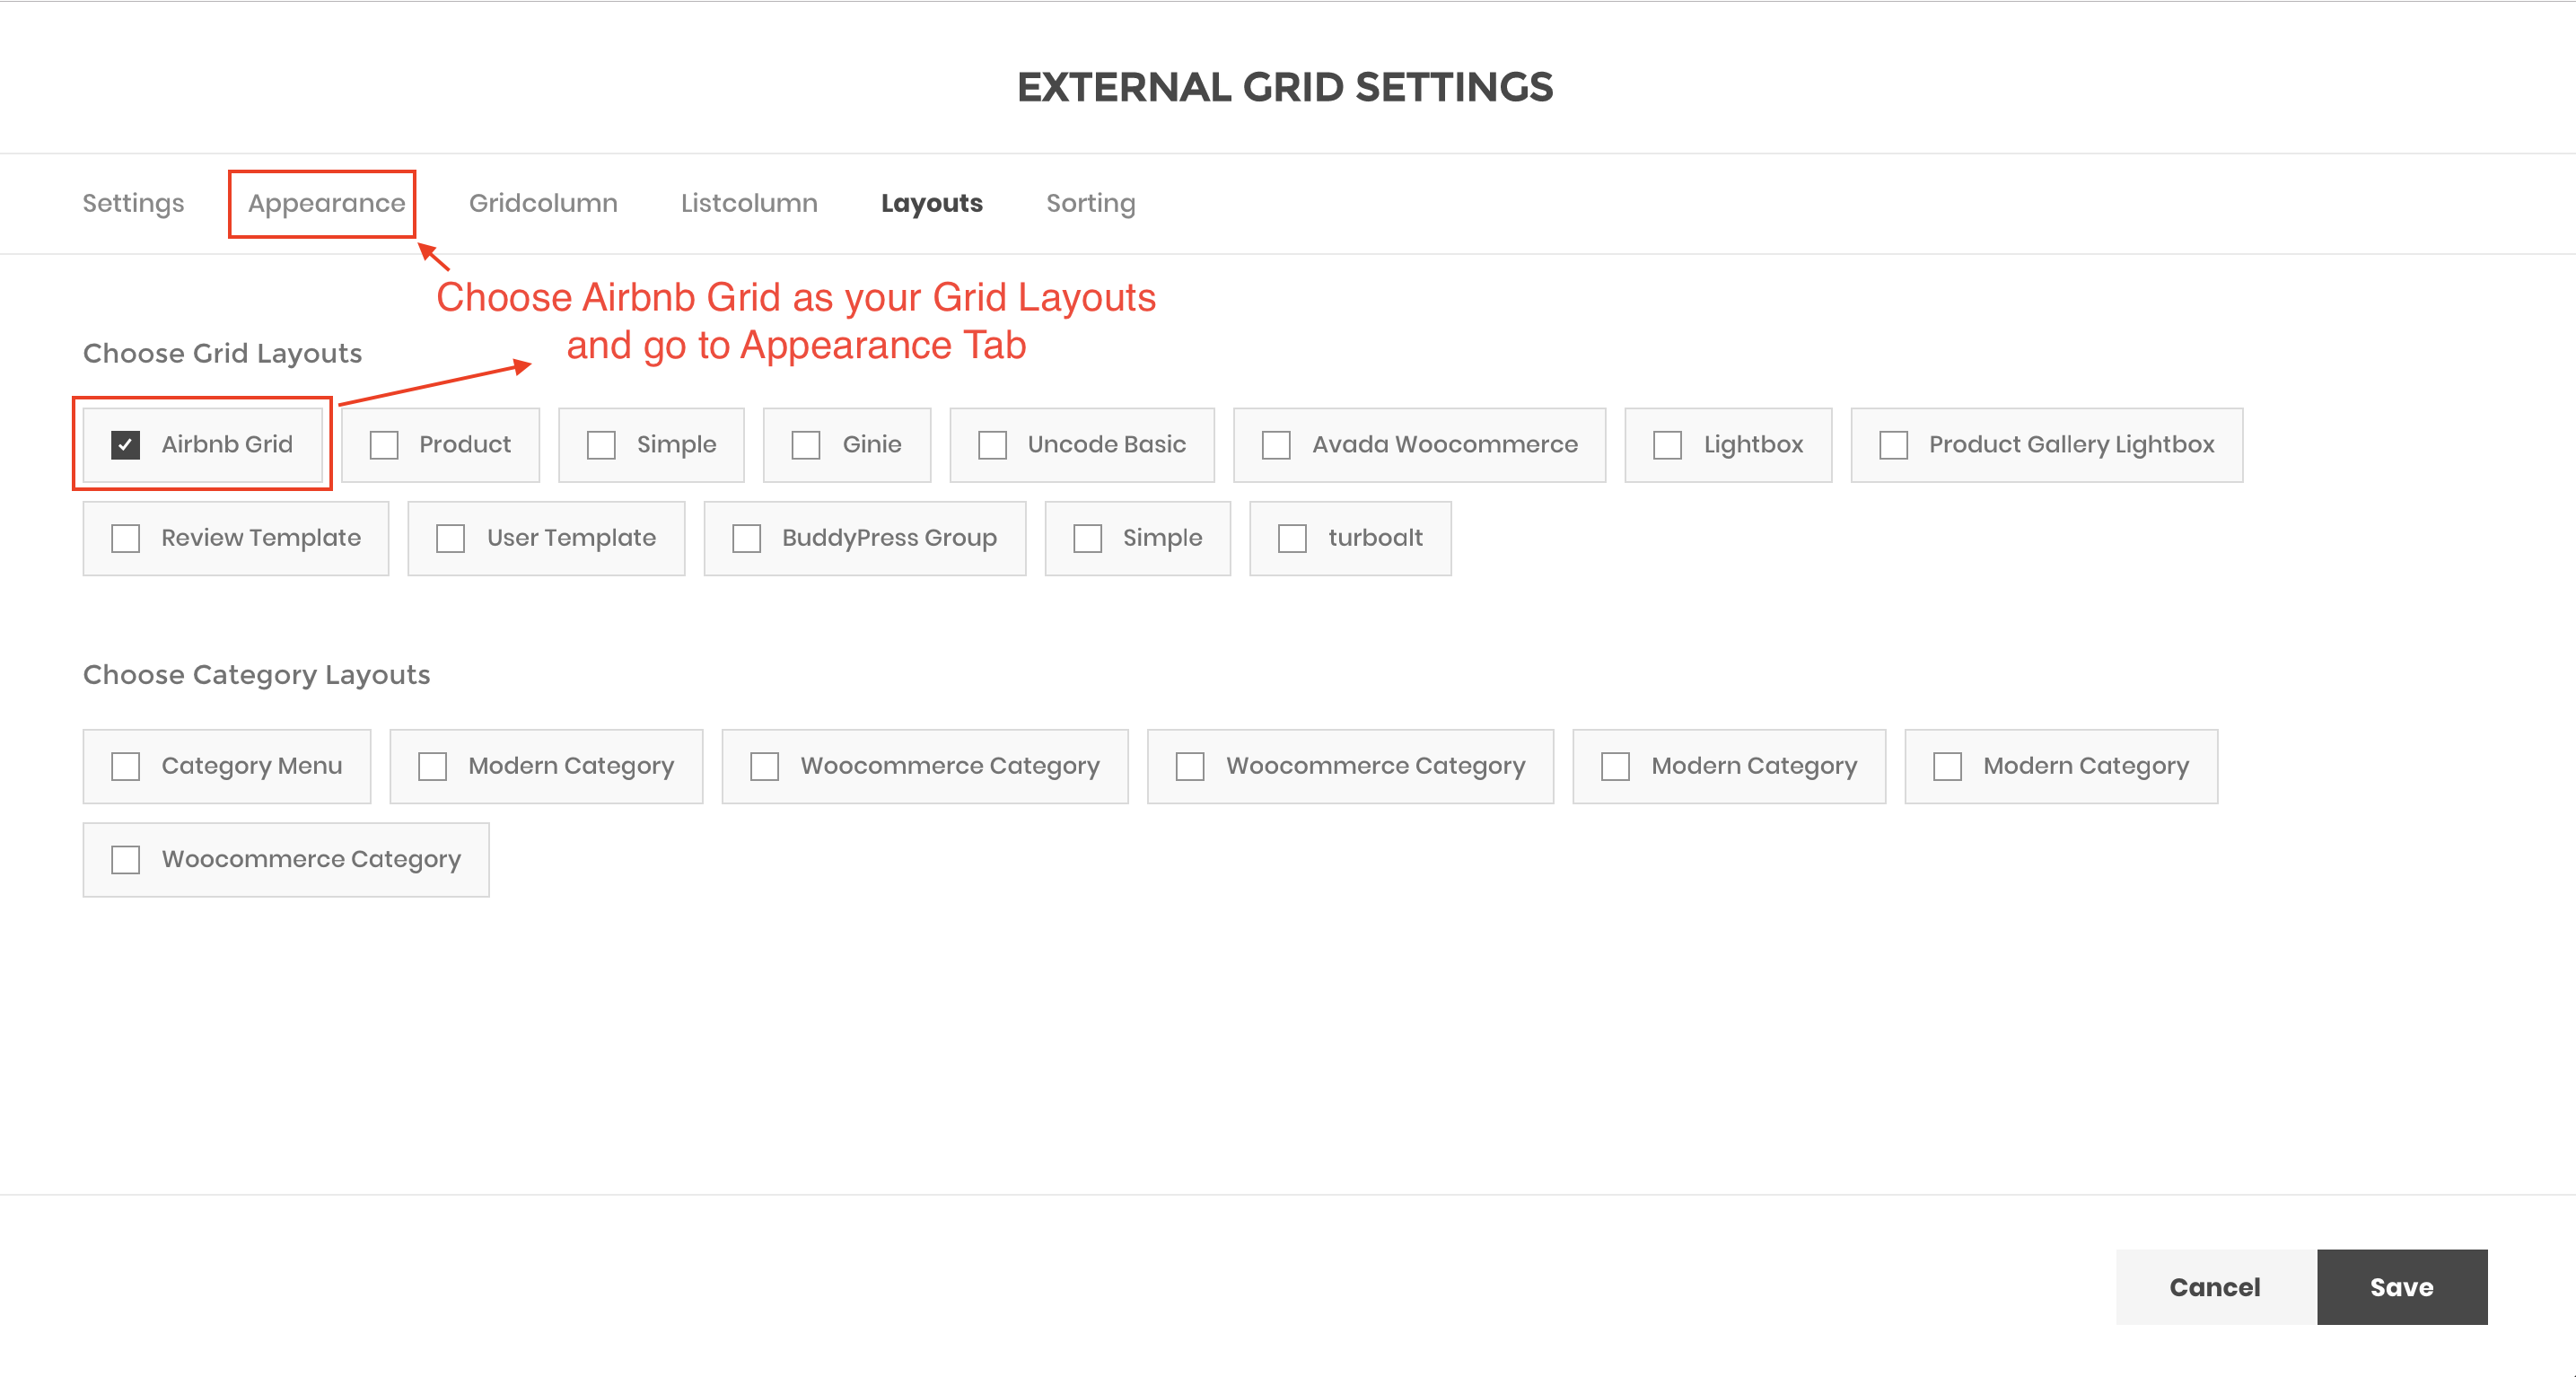 Now you will get the final view of your home page similar to the below screenshot.
 If you want to have another product grid like our demo's home page follow this same procedure.
If you want to customize product grid template based on your data or want to have a custom design you can follow our Reactive Grid Documentation. Here is the documentation link: https://redq.gitbooks.io/reactive-pro-advance-searching-filtering/content/search-builder/backend/grid-template.html
After reading our documentation you can check our Reactive Pro's FAQ section for further customization related to Grid Template. Here is the FAQ link: https://redq.gitbooks.io/reactive-pro-advance-searching-filtering/content/faq.html