FAQ
How Does General Pricing Work ?
Admin can set general price from the back-end. It’s just like default pricing type of woo-commerce. During booking, the price calculates depending on that price.
For example, suppose you set General price as 10$ .
Now from front-end if anyone book three days the price calculate as ( 10$ + 10$ + 10$ ) = 30$
How Does Daily Pricing Work ?
Admin can set daily price from the back-end. During booking, the price calculates depending on the respective day’s price.
For example, suppose you set Saturday price as 10$ , Sunday price as 15$ , Monday price as 15$ from the back-end.
Now from front-end if anyone book three days as Saturday , Sunday and monday the price calculate as ( 10$ + 15$ + 15$ ) = 40$
Does this plugin support Inventory ?
Yes, inventory management feature is available now from v2.0. To get more information about it , you can check our online documentation from our item details page. or simply follow the link: Inventory Management
How Does Monthly Pricing Work ?
Admin can set monthly basis price from the back-end. During booking, the price calculates depending on the respective month’s price.
For example, suppose you set January month price as 10$ , February price as 15$ , March price as 15$ from the back-end.
Now from front-end if anyone book three days in January , three days in February then the total price calculated as ( 310$ + 315$ ) = 75$
How Does Day Ranges Pricing Work ?
Admin can set unlimited day ranges pricing from the back-end. During booking, the price calculates depending on the respective day range's price.
Suppose you set min day 1 and max days 5 and it’s cost as 60$, another day ranges pricing is min days 6 and max days 10 and it’s cost 50$.
You can set price asper-dayorfixedbasis.
If you set price applicable asper daythen the calculation will be like this: Now if any one book 3 days from front-end then the total price will be = 60 * 3 $ = 180$.
Now if any one book 8 days from front-end then the total price will be = 50 * 8 $ = 400$
If you set price applicable asfixedthen the calculation will be like this:
Now if any one book 3 days from front-end then the total price will be = 60$ = 60$.
Now if any one book 8 days from front-end then the total price will be = 50$ = 50$
How Can I Set Redirect to Cart Page After Clicking Book Now Button ?
There is an option in WooCommerce setting to redirect to cart page after booking. please enable this option then when you click book now button it will redirect you to cart page. You will find this option from here
Dashboard->WooCommerce->settings
How do i disable/enable pickup date and time ?
You find this option in the settings tab of product backend.
How do i disable/enable drop-off date and time ?
You find this option in the settings tab of product backend. You also find the global setting for this options from
Dashboard->woo-commerce->settings->rnb settings tab.
How do i change pickup or drop-off date title ?
You find this option in the settings tab of product backend. You also find the global setting for this options fromDashboard->WooCommerce->settings->rnb settings tab.
How do i change pickup or drop-off location title ?
You find this option in the settings tab of product backend. You also find the global setting for this options from
Dashboard->WooCommerce->settings->rnb settings tab.
How do i change resource or security deposit or additional person title
You find this option in the settings tab of product backend. You also find the global setting for this options from
Dashboard->woo-commerce->settings->rnb settings tab.
Is your plugin work smoothly with others WooCommerce default product types ?
Yes . it is fully compatible with WooCommerce default product types .
How can i check admin functionality of this plugin ?
URL
username : demo
password : demo
For this , you have to login with the above credentials . Then you have to go Dashboard->products->add new , then from product type drop-down select the rental product. Then you can see all admin functionality of this plugin.
How to make product single page like our demo ?
We used a customized theme named Easy Commerce RNB to represent our demo and we customize their product single page to implement our own design concept. It’s is not any related part of our plugin. This design will not match with Easy Commerce RNB's product single page. We customize code with premium support. If you want this design you can take our premium support and please contact through our support system
How Does Hourly Pricing work ?
If you total rental or booking day less than 1 day then the booking cost will be calculated as hourly price rate. You can set hourly price from product backend. It works as following.
Suppose you set per hour price as 10$ from product backend . Now if your total rental day becomes less than 1 day like 2 hours then the booking cost will be 10*2 = 20 $.
If your total booking or rental days becomes more than 1 day then the hourly price will not work.
Back-end RnB Calendar is broken.
It is a problem with the database and the orders that caused the calendar not showing, Please emptied the orders database, then it will be solved
Book now button text don’t show in front-end ?
For book now text issue, We’ve provided an option in the setting tab of product backend to set this text . Please check this and set the text. Hope you’re problem will be solved.
Add to cart button text is not showing ! How to solve it ?
Go to product back-end . From “setting tab” select “physical appearance tab”. From here you can set the button text.
Location data not showing in cart, checkout and email ? How to fix it ?
Please check our online docs Location Hope it will help you.
Where I'll find or download the latest version of plugin ?
You can download it from your download tab. or you can see the download link like this http://prntscr.com/d7ucltin plugin page https://codecanyon.net/item/rnb-woocommerce-rental-booking-system/14835145. For here you can download the latest version.
Does it support same product multiple item booking at a same time?
Sorry, this feature isn't currently available. But it will coming very soon.
Does it support WooCommerce Variable-Product variations added inside the Rental-Product?
Sorry, this procedure isn't possible.
How can i make an option non-clickable that mean this option is required?
For this you have to create a term from Dashboard->Inventory->Deposit taxonomy. So go to this taxonomy and setSecurity Deposite Clickablevalue as no.
Which payment gateways are supported by this plugin?
For payment gateway : our plugins is standard wooCommerce extension. It supports all payment gateways which are supported by wooCommerce. You can check all supported payment gateway from here https://woocommerce.com/product-category/woocommerce-extensions/payment-gateways/.
By default , it provides PayPal, Direct bank transfer and Cash on Delivery payment method.
Does this plugin work on multisite ?
Yes, Our plugin works fine on multisite. For here you can read one of our customer review regarding this
It took some time to find out but now I can confirm that this plugin works on multisite. The trick is that you can’t activate WooCommerce or this plugin on network level but you must do it on sub-site level …
How to delete date from admin panel?
Every product create child products depending on it inventory item. You will find these child post in Dashboard->Inventory directory. You can delete the date from the child product of main product.
How to translate Admin text?
WPML allows you to translate contents of the Customizer or different theme options as like sliders, footer, and widgets.
Finding the theme options and making them translatable
To make the theme options translatable go to the WPML ->String Translation page and click the Translate texts in admin screens option.
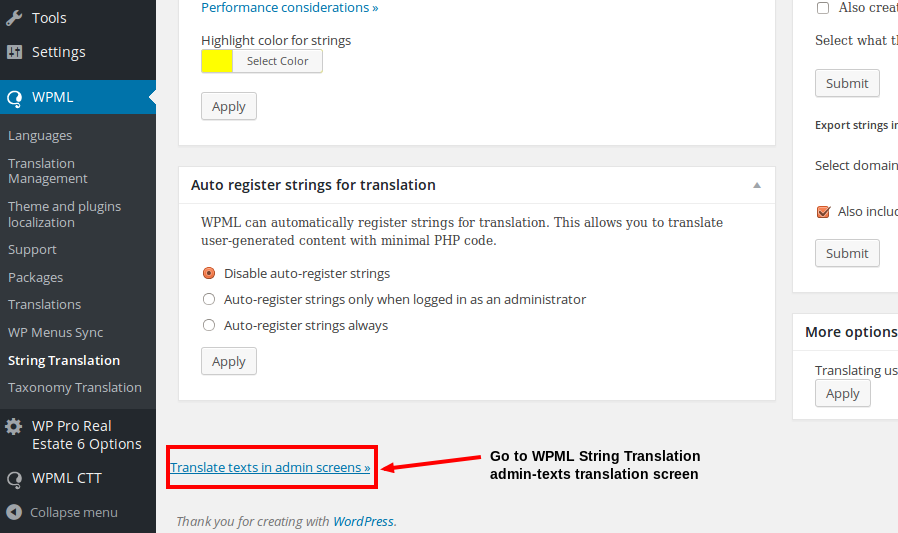 On this page, you have to find the right option. Usually, theme options are listed somewhere below theme_mods_{themename}.
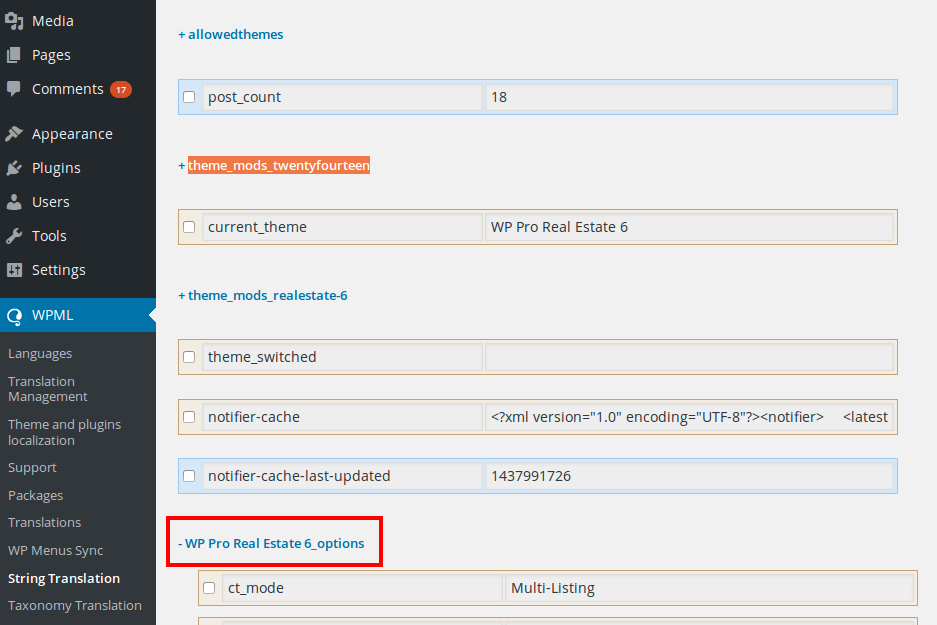
The following image shows an example, where we looked for the WP Real Estate Pro theme’s options and found them under WP Pro Real Estate 6_options.
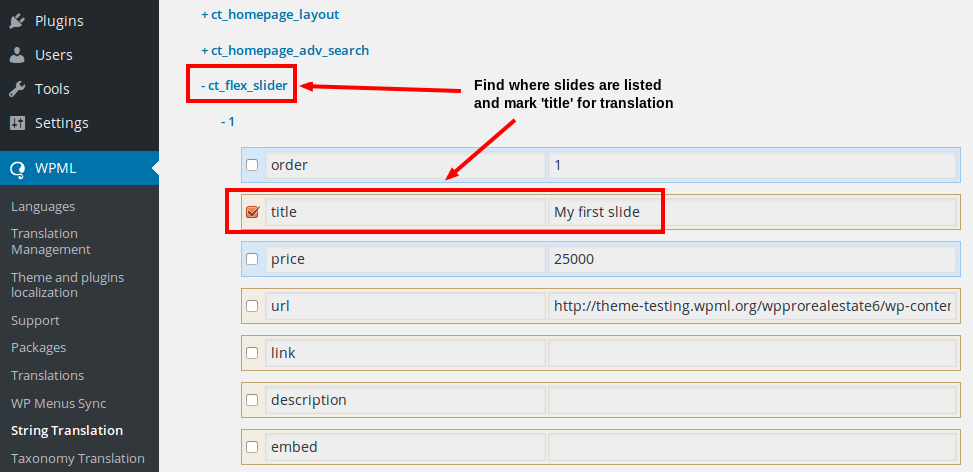
 Theme options are presented in a tree view and inside, we found the sliders stored under the name ct_flex_slider. We checked all slide titles to make them translatable.
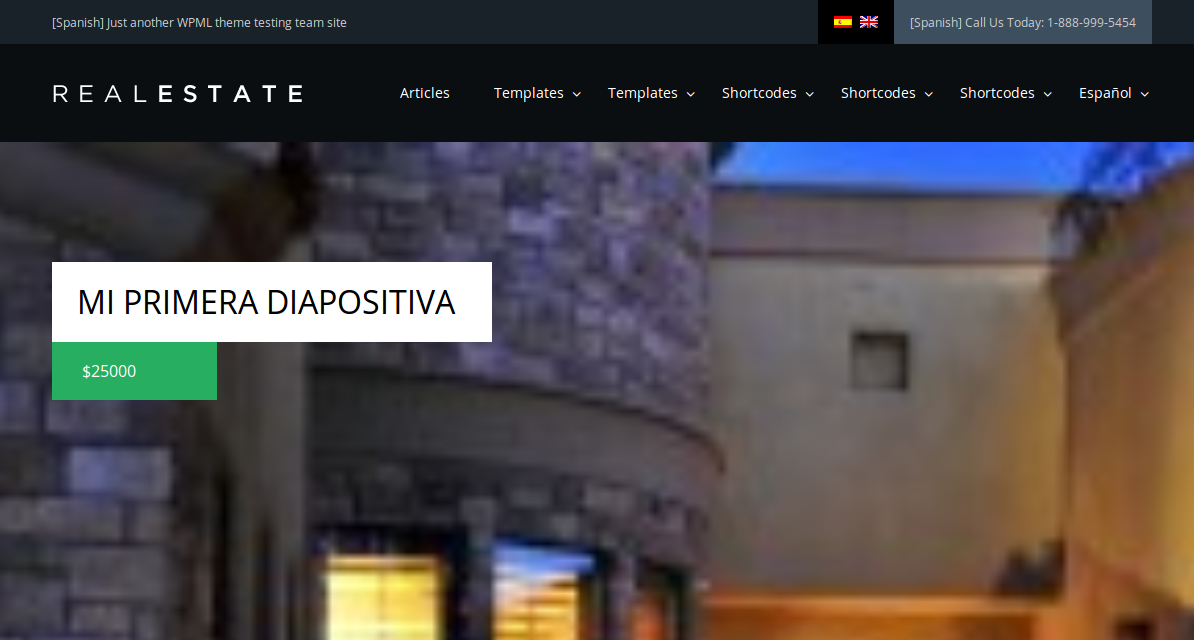
Translating the theme options
Now that the theme options are marked as translatable, they appear on the WPML->String Translation page. You translate them just like any other strings.

The following image shows our slides on the front-end after we translated all the slide title strings.
Other types of theme options
Besides slides, you can use this approach for translating any other theme options.
For example, custom Widgets are usually found under options named similar to widget_{widget_name}.
Translating your theme options directly on the theme options panel
You may face situations where you need to assign a different value for your theme options directly from the options panel. This is possible with WPML API since 3.9.3 version, however, it requires adding some code and using the wpml_multilingual_options function.
Translating your Favicon
Since WordPress 4.3, WordPress implemented a Site Icon feature that enables favicon in your web site. You only need to specify a square image that is at least 512 pixels in width and height, from the Appearance->Customize screen.
1. Click the “Site Identity” in the Customizer menu.
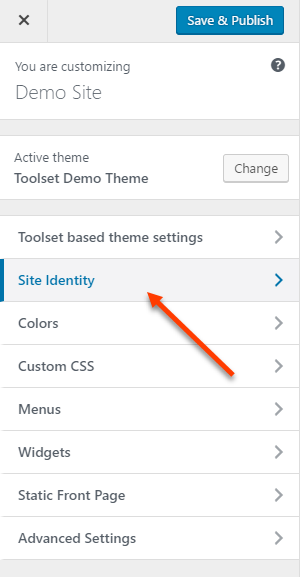
2. Add or change a “Site Icon”.

As you can see, Site Icon is a Customizer option, so its translation is not different than for any other option. Basically, it takes the ID of the image you select to be your Site Icon and uses it for displaying on the front-end.
To use different images as Site Icons in other languages, you need to “translate” this ID by specifying the appropriate image IDs for this option in other languages.
Let’s do this step by step!
Go to the WPML->String Translation page and click the Translate texts in admin screens link at the bottom of the page. On the next page, scroll down until you find the site_icon option. Select it and click on the Apply button to save your options.

Now, this option is available on the String Translation panel and you need to translate it. In order to do this, you need to add the ID of your image that will correspond to the favicon translation.
The next step is to obtain the ID of that image. For this, you need to upload a new favicon image on the Dashboard–>Media Library page. When you hover your new image, you can see its ID on the URL as displayed in the image below.

Alternatively, you can select it and take note of the URL ID. Both are perfectly fine and point to the same ID. In our example it is 2217.
Finally, go to the WPML–>String Translation page and select the admin_texts_site_icon domain using the top search. Under this domain, you will find your site_icon. Translate it by adding the ID or your new favicon.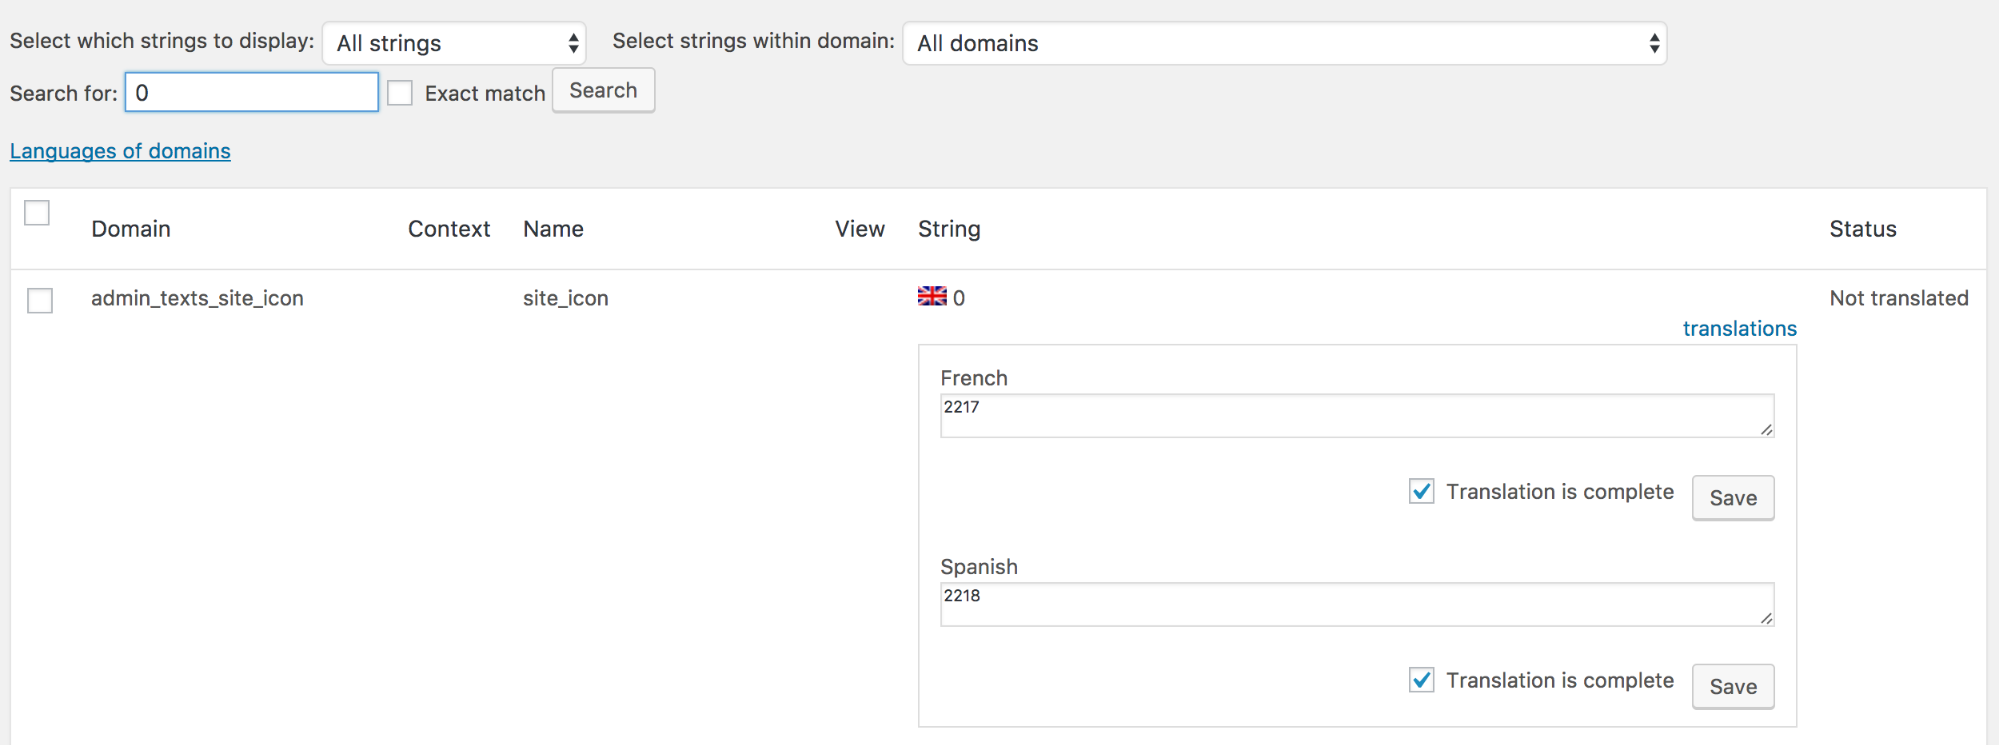
Resolving issues with MaxInputVars value
If you encounter a problem during saving this could be due to a to low value of MaxInputVars. To check the minimum MaxInputVars value required to save the page do the following:
- Go to WPML -> String translation and open a Translate texts in admin screens link.
- Open your browser’s console and go to Console tab. Each browser has a different way for invoking a console. In Google Chrome you need to press F12 on your keyboard and in Mozilla Firefox shortcut is Shift+Control+K.
- Enter command
jQuery('input').lengthinto Console tab and press Enter.
The value that is returned is the minimal MaxInputVars value required to save the page.
To increase PHP limit for max_input_vars you need to edit either php.inior.htaccessfile. Let us say that you want to increasemax_input_varsvalue to 10000. You could one of the following:
add line
max_input_vars = 10000tophp.iniadd line
php_value max_input_vars 10000to.htaccess
If you do not have permission to change your server settings you can ask your hosting provider to increase the value of MaxInputVars.
If you can not increase the value of MaxInputVars you can add strings to translation with wpml-config.xml file.