Multi Language Support.
Isomorphic supports multi language. It became very useful to people from around the world.
For multi-language conversion Isomorphic use https://github.com/yahoo/react-intl library.
Lets discuss the procedure step by step of how to Add/Convert into new languages.
Step 1 :
Go to Project Root folder > src folder > languageProvider folder
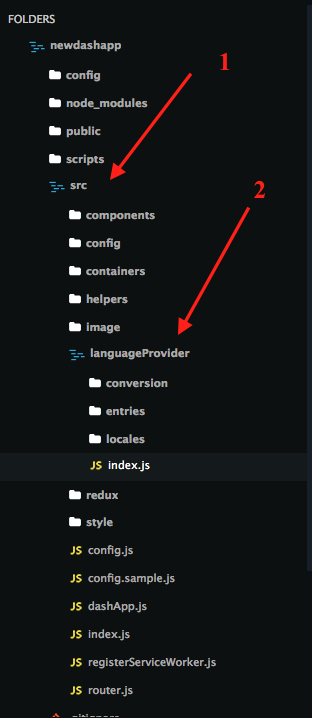
Open index.js file and Add the language name into const AppLocale which you want to add into Isomorphic App.
const AppLocale = {
  en: Enlang,
  zh: Zhlang,
  sa: Salang,
  it: Itlang,
  es: Eslang,
  fr: Frlang
};
for example you want to Add/Convert German language.
then add de language code into AppLocale constant like this.
const AppLocale = {
  en: Enlang,
  zh: Zhlang,
  sa: Salang,
  it: Itlang,
  es: Eslang,
  fr: Frlang,
  de: GermanLang
};
and Add this code addLocaleData(AppLocale.de.data);
Step 2 :
create a new file in src > languageProvider > entries > de_DE.js fileand paste this code.
import antdSA from 'antd/lib/locale-provider/de_DE';
import appLocaleData from 'react-intl/locale-data/de';
import deMessages from '../locales/de_DE.json';

const deLang = {
  messages: {
    ...deMessages
  },
  antd: antdDE,
  locale: 'de-DE',
  data: appLocaleData
};
export default deLang;
Step 3 :
Now, create a JSON file named de_DE.json in src > languageProvider > locales folder.
Step 4 :
This is the big step for the language conversion. To change language in every Isomorphic components this is the general procedure. Let's discuss an Alert box component inside the FeedBack section.
Step 4.1
copy all the element from en_US.json _file and paste this into de_DE.json _file. Now all the text strings are listed there. Just translate every json element's value into German language.
Example :
"sidebar.formsWithValidation": "Forms With Validation" will be convert like this
"sidebar.formsWithValidation": "Formulare mit Validierung"
Step 5 :
To add this new language into Sidebar switcher option, follow this file path src > containers > languageSwitcher > config.jsfile.
add the new icon image from image folder in the top of the file like this import italianLang from '../../image/flag/german.svg';
Then add this new Language into config -> option array by this
    {
      languageId: 'german',
      locale: 'de',
      text: 'German',
      icon: germanLang,
    },
Step 6 (additional step) :
To chose the default language of Isomorphic go to this file src > config.js and change this code const language = 'english'; into const language = 'german';
This will initiate german language as default language.
Ta-Da!!
Thanks for reading & understanding the process. It's not that hard. For any inquiries or issues you can contact with us via our support portal https://redqsupport.ticksy.com/